
Propagation
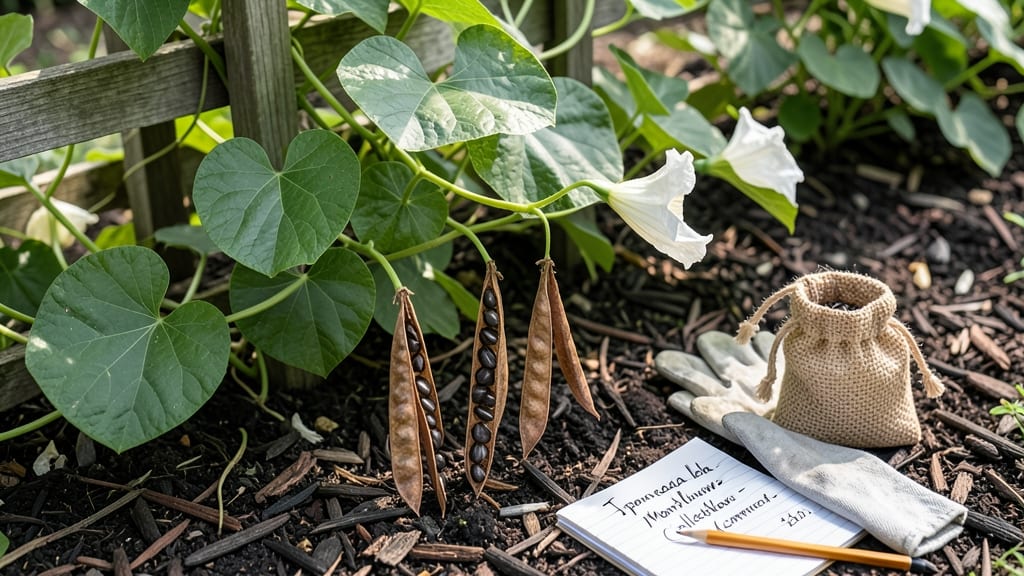
If you’ve ever watched a 🌙 Moonflower bloom under the moonlight only to wonder how to harvest those seeds for next year, you’re not alone. The the harvesting Moonflower seeds at the perfect moment is the key to ensuring your garden stays bright with these magical vines.
Timing is everything—wait too long, and the seeds lose viability; harvest too early, and they won’t germinate properly. I’ll walk you through the exact signs to look for, from the telltale brown pods to the hard, dark seeds inside, so you never miss the window.
Once you’ve identified the right pods, the next challenge is drying and storing them correctly. A little patience here makes all the difference between seeds that sprout and ones that fail. Let’s break down the step-by-step process to keep your Moonflower seeds fresh and ready for planting.
Even experienced gardeners make mistakes with seed harvesting—like overripe pods or improper storage—that can ruin your chances. I’ll share the most common pitfalls and how to avoid them, so you can confidently save seeds for years to come.


When and how to identify moonflower pods ready for seed harvesting
Moonflowers (Ipomoea alba) produce stunning white nocturnal blooms, but their true gardening magic lies in the seed pods that follow. Knowing exactly when to harvest these pods is crucial—too early, and your seeds won’t germinate; too late, and they’ll lose viability.
The key lies in observing three critical cues: pod color, texture, and seed maturity. Let’s break down how to spot the perfect pods for harvesting.
First, focus on the pod color change. When moonflower pods are fresh and green, they’re still developing seeds. As they mature, they’ll gradually shift from bright green to pale brown, and finally to a deep, dry brown.
This color transformation signals that the seeds inside are nearing readiness. However, don’t wait until the pods are completely brittle—harvest just as they turn brown but before they fully dry out and split open on their own.
Texture is your next clue. Ready-to-harvest pods feel dry and papery to the touch, almost like crumpling parchment. If you press gently and hear a slight rustling sound, that’s a good sign. In contrast, unripe pods will feel firm and slightly rubbery, while overripe pods may crumble into dust. This tactile check is especially useful when color alone isn’t enough to make a decision.
Now, let’s talk about the seeds themselves. Inside a mature moonflower pod, you’ll find dark brown or black seeds that are hard and dense. These seeds should not be soft or light-colored, as that indicates immaturity.
If you can easily crush a seed between your fingers, it’s not ready for harvesting. Instead, aim for seeds that feel solid and resistant—these are your best bet for high germination rates.
| Stage | Pod Color | Pod Texture | Seed Condition | Action |
|---|---|---|---|---|
| Unripe | Bright green | Firm and rubbery | Soft, light-colored | Wait 1-2 weeks |
| Mature (Ready) | Deep brown | Dry and papery | Hard, dark brown | Harvest immediately |
| Overripe | Gray/brittle | Crumbly | Dusty or moldy | Discard |
| Cracked Open | Brown and splitting | Dry but open | Seeds may scatter | Harvest seeds ASAP |
Timing is everything when it comes to moonflower seed harvesting. The best time of day to check your pods is on a dry, sunny morning. This gives you the clearest view of their color and texture.
Avoid harvesting after rain, as moisture can accelerate pod decay and reduce seed quality. If you’re unsure whether a pod is ready, cut it open and inspect the seeds—this quick check can save you from harvesting too early or too late.
Don’t overlook the plant’s natural signals. As moonflowers prepare for dormancy, their leaves will start yellowing and dying back. This is nature’s way of telling you that the seed production cycle is nearing its end.
If you wait until the entire vine looks tired, you might miss the optimal harvest window. Stay proactive by monitoring your plants weekly during late summer to catch the perfect pods.
One common mistake is assuming that all pods on a vine mature at once. In reality, moonflowers produce pods over a 2-3 week period, so you’ll need to harvest them in batches.
Start with the earliest pods that turn brown and work your way through the vine. This staggered approach ensures you don’t miss any viable seeds while also preventing overripe pods from contaminating your harvest.
Finally, consider the environmental conditions in your area. If you’re in a hot, dry climate, pods may dry out and split open more quickly. In contrast, cooler or humid conditions can slow down the ripening process.
Adjust your harvesting schedule accordingly—harvest sooner in dry heat and wait slightly longer in cooler weather. Paying attention to these local factors will help you fine-tune your timing for the best results.
Once you’ve identified the perfect pods, act quickly but carefully. Use a sharp pair of pruning shears to snip the pods from the vine, leaving a small stem attached.
This reduces damage to the plant and makes it easier to handle the pods during the drying process. Store your harvested pods in a
Step-by-step process for extracting and drying moonflower seeds properly
Once you’ve spotted those brown, cracked moonflower pods, it’s time to act quickly. The seeds inside are delicate and must be handled with care to maintain their germination potential.
I’ve learned the hard way that rushing this process can lead to moldy seeds or premature sprouting—so let’s do it right.
Start by gently twisting the dry pods to open them. Avoid cutting or forcing them open, as this can damage the seeds. Use clean, dry hands or wear gloves to prevent contamination.
Place the open pods on a clean surface, like a paper towel or tray, to catch any seeds that might fall out.
Step-by-Step Guide to Harvesting Moonflower Seeds
-
1. Open the Pods
Twist the brown, dry pods gently until they split open. If they resist, let them sit in a paper bag for 24 hours to soften further. -
2. Remove the Seeds
Extract the dark, hard seeds from the pods using your fingers or a small spoon. Discard any seeds that look shriveled or discolored. -
3. Air Dry the Seeds
Spread seeds on a paper towel or mesh screen in a well-ventilated area for 3–5 days. Avoid direct sunlight to prevent overheating. -
4. Optional: Oven Drying
For faster drying, spread seeds on a baking sheet and bake at 120°F (49°C) for 1–2 hours. Check frequently to avoid burning. -
5. Store Properly
Place dried seeds in a paper envelope or airtight container with a silica gel packet to absorb moisture. Label with the harvest date.
After removing the seeds, it’s crucial to dry them properly. I recommend air drying first, as it’s the gentlest method. Lay the seeds on a paper towel in a cool, dry place with good airflow.
This typically takes 3–5 days, but keep an eye out for any signs of mold or dampness.
If you’re short on time, an oven can speed up drying, but be cautious. Set your oven to its lowest setting—around 120°F (49°C)30 minutes to ensure they don’t overheat, which can reduce viability.
Once fully dry, store your seeds in a cool, dark place like a glass jar or paper envelope. Adding a silica gel packet helps absorb excess moisture, which is key to preventing mold. Label the container with the harvest year so you don’t forget when they’re ready to plant.
With these steps, your moonflower seeds should stay viable for 2–3 years, ready to bring next summer’s garden to life under the moonlight. 🌙